Experimenting with softare development for the str9-comstick on Ubuntu Linux
I bought the str9-comstick about a year ago and it has sat in my laptop bag for all that time. Anyway, I took it out the other day and had a look to see what I could do with it using ubuntu and the gcc/arm toolchain. I've worked with other Arm based chips before - most notably the lpc2148. This Arm-9 device is new to me however.
Getting the toolchain
Before doing anything I needed to get hold of the gcc. I got mine from gnuarm.com here. This suited my distro (64 bit Ubuntu 9.04) and was reasonably up to date (gcc version 4.02). It also included libaries, binutils and, best of all insight for debugging.
Extract the archive to your home folder (or whereever you like though be careful to confine it to some area you are comfortable to work in. I opted with a directory off my home folder and did not have to elevate my privilege level via 'sudo'. Once installed, its probably best to add the directory containing the compiler binaries to your path.
I did this by adding the statement
export PATH=~/arm_devel/gnuarm-4.0.2/bin:$PATH
to the '.profile' file in my home directory. Anytime I login or open a shell the path is then set up correctly.
OpenOCD
In order to interact with the str9-comstick (and other development kits) you need to install openocd (http://openocd.berlios.de/web/). Fortunately openocd is included in ubuntu's software repositories so its a simple 'sudo apt-get install openocd' away. Openocd acts as a sort of intermediary between gdb (and insight) and the chip being debugged.
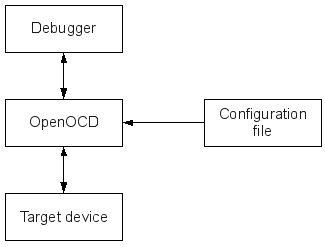
OpenOCD is capable of connecting to many different chips (targets). It requires a configuration file and here is the one I have found to work -so far :0) .
Connecting to the target board
Connecting to the target board is usually easy but sometimes has a few glitches. First the device needs to be plugged in. Next openocd needs to be run with root privilege as it interacts with the hardware directly (sure there are ways around this but this isn't a lesson on Linux permissions). Once the device is plugged in, openocd is run as follows:
sudo openocd -f str9comstick.cfg
The sorts of errors you can get here are:
1) The board didn't reset properly. Plug it out and try again.
2) The wrong usb device ID's have been entered. Execute lsusb and hopefully you should see a reference to the comstick in the list as follows:
Bus 004 Device 002: ID 0640:002c Hitex Development Tools
The ID values here should match the line in str9comstick.cfg that reads:
ft2232_vid_pid 0x0640 0x002c
3) The wrong device description has been used. Execute the following:
sudo lsusb -v | grep iProduct
You should see a line like this:
iProduct 2 STR9-comStick
The phrase 'STR9-comStick' must exactly match the line in str9comstick.cfg that reads:
ft2232_device_desc "STR9-comStick"
Apart from these problems, other errors are of course possible but these are the ones that arose most for me.
Sorting out the compiler environment 1: the linker definition file
Writing code for the chip is relatively straightforward at one level. Use your favourite editor, write your c-code, and compile using arm-elf-gcc instead of the usual gcc. Beneath this, some extra stuff is needed.
First of all, you need some way of telling the linker where it can find the memory (of various kinds) on the comstick. This information is encapsulated in a linker definition (ld) file. There's lots of interesting stuff in these files. First of all you should figure out the memory map of the processor in question. The str9-comstick uses an st912FW44 device. This has 512k of flash memory which starts at address 0. It also has 96k of RAM that starts at address 0x40000000.
You now need to tell the linker where to place the different sections of its output (executable file) within the available memory. The gnu linker makes use of a few 'standard' sections.
text: This is where your code and constants go. This is usually mapped to ROM.
data: This is where all your variables go and obviously needs to be mapped to RAM.
bss: This is where data that is initialized to zero must go. Mapped to RAM.
There are other sections and a quick look on the web will reveal more about them. One link that stood out for me was: http://www.davehylands.com/avi/linker_scripts.htm. This deals with a different micro but has a good description of the various linker sections. Anyway, I settled on the following linker definition file which I came across (somewhere) and was largely assembled by Martin Thomas with some slight editing by me.
Sorting out the compiler environment 2: initialization code (crt.s)
Some basic stuff needs to happen when the processor starts up. It is simply not possible to do all of this in C as internal registers within the arm9 core need to be written to. The startup code needs to setup the different stacks and processor status registers for the different ARM operating modes. It may need to configure certain aspects of the system's memory. It also looks after the initialization of static/global variables. Skeleton code is also included for various interrupt handlers. Note: The IRQ interrupt routine is handled separately (see later).
I've put this following crt.s file together which works for me at the moment.
Sorting out the compiler environment 3: a starter makefile
Again I've fallen back on Martin Thomas for some help here. Martin produced an excellent template which I've modified slightly to suit the str912fw44 (arm966e). You can find this here. If you add more 'C' files to your project you need to include them in the section 'SRCARM'. Suppose you want to add a file 'helloworld.c'. You include this in your project by adding in a new line just after the existing one starting with SRCARM (or replace the existing one):
SRCARM += helloworld.c
A new project: Blinky
Ok, now for the 'hello world' equivalent of embedded systems: Make an LED flash on and off. The str9-comstick has an LED attached to the least significant bit (B0) of
port 9. The code to make it blink is really quite straightforward and can be downloaded here. You might notice that the input/output port subsystem
has to be turned on at first. This is typical of this processor which starts up in a pretty low power configuration. Just about all of the peripherals are turned off at boot time. Bear this in mind if something just refuses to work for you.
In order to build blinky you need to have all of the following files in the one directory:
blinky.c
crt.s
arm966e-ROM.ld
Makefile
Type 'make' to build the program and if your paths are setup correctly all should be well and the executable program main.elf should be created.
Running blinky
Running and debugging a program on a development kit may seem a little arcane at first however if you persist it should become a little more 'natural' to you. First of all you need to run openocd as follows:
sudo openocd -f str9comstick.cfg
Note the use of 'sudo'. You need to run openocd at elevated privilege. This command assumes str9comstick.cfg is in the current directory and that the comstick is plugged in to you computer. I get the following message when I run it:
Open On-Chip Debugger 1.0 (2008-11-26-09:52) svn:unknown
BUGS? Read http://svn.berlios.de/svnroot/repos/openocd/trunk/BUGS
$URL: http://svn.berlios.de/svnroot/repos/openocd/trunk/src/openocd.c $
3000 kHz
Info: JTAG device found: 0x04570041 (Manufacturer: 0x020, Part: 0x4570, Version: 0x0)
Info: JTAG device found: 0x25966041 (Manufacturer: 0x020, Part: 0x5966, Version: 0x2)
Info: JTAG device found: 0x2457f041 (Manufacturer: 0x020, Part: 0x457f, Version: 0x2)
Warning:no tcl port specified, using default port 6666
The command does not exit unless an error occurs or you press CTRL-c.
Now to load the program to the chip. In a new terminal do the following:
telnet localhost 4444
This connects you to openocd and allows you to control the comstick as well as download programs to it.
Just to shed a little light on what's going on type in the following commands (within your telnet session):
halt
flash info 0
You will see the following result (all going well):
#0: str9x at 0x00000000, size 0x00080000, buswidth 0, chipwidth 0
# 0: 0x00000000 (0x10000 64kB) protected
# 1: 0x00010000 (0x10000 64kB) protected
# 2: 0x00020000 (0x10000 64kB) protected
# 3: 0x00030000 (0x10000 64kB) protected
# 4: 0x00040000 (0x10000 64kB) protected
# 5: 0x00050000 (0x10000 64kB) protected
# 6: 0x00060000 (0x10000 64kB) protected
# 7: 0x00070000 (0x10000 64kB) protected
str9x flash driver info
This tells you that the debug system is basically working. It also tells you that there are 8 flash sectors each 64k long (total 512k). The memory is protected. In order to download your program you need to turn the protection off first as follows:
flash protect 0 0 7 off
Now download the program (your path to main.elf may vary):
flash write_image erase blinky/main.elf 0
To run your program you have to reset the comstick. This can be done with the reset command in the terminal window or by plugging it out and in again. If it seems not to run at first try stopping and restarting openocd as this resets the JTAG interface to the chip allowing it, in turn, to come out of reset.
Hopefully blinky works for you.
Next steps
Where to next? As far as I'm concerned, you've not really got into the interesting part of a microcontroller until you get to play with its interrupt system. So.... onwards to a timer interrupt based version of blinky.
A simple timer interrupt handler is available here. Untar everthing into a folder, run make and you should end up with an executable called main.elf which you can download to the comstick. When you reset the device as described above
you should see the onboard LED flash repeatedly.
Comments and feedback
If you want to comment constructively :) on the above, or if you have
questions contact me at frank dot duignan at dit dot ie.